Telegrambot with a raspberry pi
Why a Telegram bot?
Telegram is a messaging app that can be accessed by multiple devices. They have created an easy to use api. This api is what makes this possible. We will use it to send messages to the bot and complete actions. You can make an easy to use hub where you send a message and something happens, like turning on a light.
What we are going to make.
We are going to make a script that uses the telegram api to recieve messages with instructions on what LED to put on, but you can use the telegram bot for everything you can think of.
Preparing the raspberry pi
What you will need.
- micro-SD card
- SD reader
- Raspberry pi
Installing raspbian OS
You will need an OS on your Pi if you want scripts to run on it. For this I chose Rasbian OS. To do this you need to flush the usb. The easiest way is to use **Raspberry Pi Imager. Once it’s installed you just have to choose an OS. I chose under other “Raspberry pi OS Lite (64-bit)”. Then you have to select the storage (Your micro-SD card) and hit write. This will flush the micro-SD so the Pi can read it as an OS. If you hit CTRl + Shift + X you can edit the basic settings from the pi imager. I recommend enabling SSH.
Configuring the Raspberry Pi
You can connect to your Pi directly with and micro-HDMI - HDMI cable and a keyboard or connect to the pi via SSh with this command. (You’ll need an internet cable for this)
ssh pi@raspberrypi.localOnce your in the terminal you login with the credentials:
- pi
- raspberry
Once logged update all packages
sudo apt update && apt upgradeand install python
sudo apt install python && apt-get install python-rpi.gpio python3-rpi.gpioFor this program you’ll need the telegram bot package.
sudo pip install telebot && pip install requestsMaking the circuit board
What do you need
- Raspberry pi 3 - Model B
- BreadBoard
- 3 colored LEDs
- 3 100 Ohm resistors
- 4 male-female cables
- 3 male-male cable
How to assemble it.
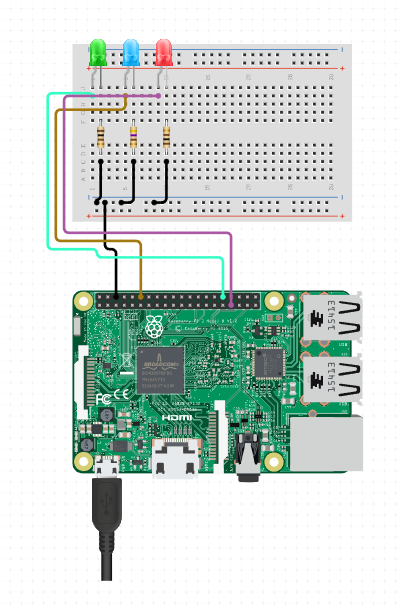
Make sure the LEDs are connected to the right pins.
Green = 18
Blue = 12
Red = 13
Getting the api token
Download telegram
You can create your account here.
Create an account using your phone number
You just enter your phone number and enter the code you received.
Inviting the BotFather
Once your logged in you can invite the BotFather here. You start your chat and send /start. This will start the conversation and you just have to type /newbot to receive your own bot. You give it a name and a bot name. The name is what you want to call it and the bot name is what the server will remember and it has to contain the word bot. You will get an api token. This is used to access your bot and you should never give it to someone else.
Creating the script
I use VSCode with the remote explorer to connect to my pi and program from my windows, but you can also just code in the terminal. You have to create a file. Let’s call it blinkBot.py. In this file we start with importing some packages:
import RPi.GPIO as GPIO    # Import Raspberry Pi GPIO library
from time import sleep
import telebot, requests
Now that we have or packages we can star with creating a variable for or token we got from the BotFather and set the GPIO pin ready
TOKEN = 'Token here'

Green = 18
Blue = 12
Red = 13

GPIO.setmode(GPIO.BCM) #There are 2 modes BCM and Board. BCM uses the GPIO numbering and Board uses the pin numbering
GPIO.setup(Green, GPIO.OUT) #This sets the green in as an output pin
GPIO.setup(Blue, GPIO.OUT)
GPIO.setup(Red, GPIO.OUT)
Now we can create the infinite loop so we can keep sending messages to the program.
tb = telebot.TeleBot(TOKEN)
tb.set_update_listener(listener) #register listener
tb.infinity_polling(interval=3, timeout=20, none_stop=True)
while True: # Don't let the main Thread end.
    pass
After that we can create or first function. This should be placed between the Token variable and the loop. This function will read the message and give the text to the progra.
def listener(messages):
    """
    When new messages arrive TeleBot will call this function.
    """
    for m in messages:
        chatid = m.chat.id #This is the id of your chat so the api knows where they need to send the text
        if m.content_type == 'text':
            tb.send_message(chatid, "I'm working on it") #This will send a message to show it's runnning
            runProgram(m.text, chatid)
Now we can create our runProgram function. This will be where the LEDs get controlled.
def runProgram(text, chatid):
	GPIO.output(Green, GPIO.LOW) # LOW = Off
	GPIO.output(Blue, GPIO.LOW)
	GPIO.output(Red, GPIO.LOW)

	if text=="Green":
		GPIO.output(Green, GPIO.HIGH) # HIGH = On
		tb.send_message(chatid, "Green is turned on")
	elif text=="Blue":
		GPIO.output(Blue, GPIO.HIGH)
		tb.send_message(chatid, "Blue is turned on")
	elif text="Red":
		GPIO.output(Red, GPIO.HIGH)
		tb.send_message(chatid, "Red is turned on")
	elif text="off":
		tb.send_message(chatid, "Everything is off")
	else:
		tb.send_message(chatid, "I don't know this command")
You’re not limited to only things you can make you can also use api’s like the cocktail api:
elif text = "Random cocktail":
	response = requests.get("www.thecocktaildb.com/api/json/v1/1/random.php")
	data=response.json()
	tb.send_message(chatid, "You could drink a" + data["strDrink"])
All together this should look something like this:
import RPi.GPIO as GPIO    # Import Raspberry Pi GPIO library
from time import sleep
import telebot

TOKEN = 'Token here'

Green = 18
Blue = 12
Red = 13

GPIO.setmode(GPIO.BCM) #There are 2 modes BCM and Board. BCM uses the GPIO numbering and Board uses the pin numbering
GPIO.setup(Green, GPIO.OUT) #This sets the green in as an output pin
GPIO.setup(Blue, GPIO.OUT)
GPIO.setup(Red, GPIO.OUT)

def listener(messages):
    """
    When new messages arrive TeleBot will call this function.
    """
    for m in messages:
        chatid = m.chat.id #This is the id of your chat so the api knows where they need to send the text
        if m.content_type == 'text':
            tb.send_message(chatid, "I'm working on it") #This will send a message to show it's runnning
            runProgram(m.text, chatid)

def runProgram(text, chatid):
	GPIO.output(Green, GPIO.LOW) # LOW = Off
	GPIO.output(Blue, GPIO.LOW)
	GPIO.output(Red, GPIO.LOW)

	if text=="Green":
		GPIO.output(Green, GPIO.HIGH) # HIGH = On
		tb.send_message(chatid, "Green is turned on")
	elif text=="Blue":
		GPIO.output(Blue, GPIO.HIGH)
		tb.send_message(chatid, "Blue is turned on")
	elif text="Red":
		GPIO.output(Red, GPIO.HIGH)
		tb.send_message(chatid, "Red is turned on")
	elif text="off":
		tb.send_message(chatid, "Everything is off")
	elif text = "Random cocktail":
		response = requests.get("www.thecocktaildb.com/api/json/v1/1/random.php")
		data=response.json()
		tb.send_message(chatid, "You could drink a" + data["strDrink"])
	else:
		tb.send_message(chatid, "I don't know this command")

tb = telebot.TeleBot(TOKEN)
tb.set_update_listener(listener) #register listener
tb.infinity_polling(interval=3, timeout=20, none_stop=True)
while True: # Don't let the main Thread end.
    pass
This is just a simple example of many things you can make with the telegram bot. The possibilities are limitless. You can use the runProgram function to do anything you want.
Quality of life features
crontab
Crontab is used to run things automatically. To edit the crontab file, you have to go to the terminal and enter:
crontab -eOn the bottom of this file you add the following:
@reboot nohup python /route/to/file/blinkBot.py &- @reboot = This makes it so every time the Pi reboots it starts automatically
- nohup = This makes sure it doesn’t quite on it’s own
- & = This let’s it run in the background
Conclusion
Now you have a script running on your pi that acts like a hub. You can use as many commands as you want by just adding them in the runProgram function. You can ask how many followers you have on Twitter, how much your crypto currencies are worth, … . The only limitations are what you can build. The goal wasn’t to make the most useful program there is, I just wanted to show the usefulness of the telegram but and how to make a useful hub that can be used to control everything IoT. You can try and find a way to connect it to a smart light or a smart tv to turn on via a message. Or you could create something so you can post an update on Instagram, Twitter, Facebook, … all at once.